Showing posts with label Nuts Grains and Seeds. Show all posts

Saturday, January 21, 2012

Dairy-free "Cheese"

Being on a restricted diet can leave one feeling that they cannot enjoy some everyday foods, particularly if the restriction includes dairy and dairy products. I have been in this scenario before and have found that some alternatives are available, especially when it comes to cheese. One of my go-to alternative recipes is actually inspired by an ingredient loved by vegans; nutritional yeast.  Nutritional yeast is a great source for vitamin B12 and is used as a food ingredient when one is trying to acquire a cheese-like flavour, whilst avoiding dairy. (For those of you who would like to read my previous post on nutritional yeast, click here.)


This particular recipe is for a dairy-free "cheese" sauce. For this recipe, you will require following ingredients:
- 1 1/2 cup water
- 1/4 cup nutritional yeast
- 1/2 cup raw cashews
- 1 teaspoon mustard
- 1 teaspoon double-concentrated tomato paste
- 1 teaspoon salt
- 2 1/2 tablespoons agar (ground)


Agar is an ingredient that is commonly used in India, Iran and surrounding areas to make desserts like puddings, drinks and ice creams. You may know the ingredient from biology class, as it is used as the gelling agent in Petri dishes. It is also commonly known by other names including agar agar, China grass, faluda (falooda) and falooda sev, among others. Agar is basically a vegetable-based starch used to gel foods, a process that is similar to using gelatin or pectin.

In the Greater Toronto Area, you may be able to find agar at specialty food shops, bulk food stores or health food stores. However, I find that buying agar from these type of places can burn a hole in your pocket. For that reason, I prefer to visit the local East Indian grocery store to purchase it. I find that buying ingredients, such as this one, at Indian grocery stores can be done at a fraction of the price. For example, this packet below cost me approximately $2.00 CAD.

As you can see, the Indian version comes in a packed, nest-like form. The word "falooda" is often used to describe foods that have been shredded. Also, the word "sev" is used to describe vermicelli.


As the agar will need to be dissolved in this recipe, I find it easier to work with when it is broken down into smaller pieces. I simply place the agar nest into my Magic Bullet blender and pulverize it to the consistency below.

In a saucepan, slowly heat the water with the measured amount of ground agar. You don't need to boil the liquid. You simply want the agar to soften. This process should take approximately 5 minutes.

Once softened, place all of your ingredients into a blender.

Simply blend the mixture until reaches a smooth, liquid consistency. That's it! Your "cheese" sauce is ready.

You can use this cheese sauce anywhere you would use melted cheese. For example, try using it with:
- nacho chips
- tortillas or flat breads
- pasta, as I did below, for a yummy mac and "cheese"


Of course, instead of plain, every day mac and cheese, I topped mine with caramelized onions cooked with Herbs de Provence. Mmm.

Tuesday, December 20, 2011

Marroni

Every Christmas, I do a load of baking. One of my specialties is a cookie I like to call marroni (chestnut cookies). This is the third recipe in my series of gluten-free and dairy-free nut cookies. (To view my previous recipe for amaretti, click here and to view my recipe for pecan pie cookies, click here.)

Chestnut flour can now be readily found in specialty supermarkets and in bulk food stores. It imparts a wonderful flavour, reminding me of winter time.

For this recipe you will need 1 cup of chestnut flour, 1 cup blanched ground almonds and 1 cup of white sugar.

 
Mix the dry ingredients together.

For the wet ingredients, you will need to start with the whites of four eggs (8 tablespoons of egg whites). I said "start", because the chestnut flour can be a little temperamental, depending on its moisture content.
 
Whip the whites to stiff peaks.


At this point, blend in 1 teaspoon of vanilla extract.

Add the vanilla egg whites to the dry ingredients.

Fold in the egg whites to form a dough. If a dough cannot be formed, because the ingredients are too dry, feel free to add more whipped egg whites. (I have, on some occasions, used up to six egg whites or 12 tablespoons of egg whites.)

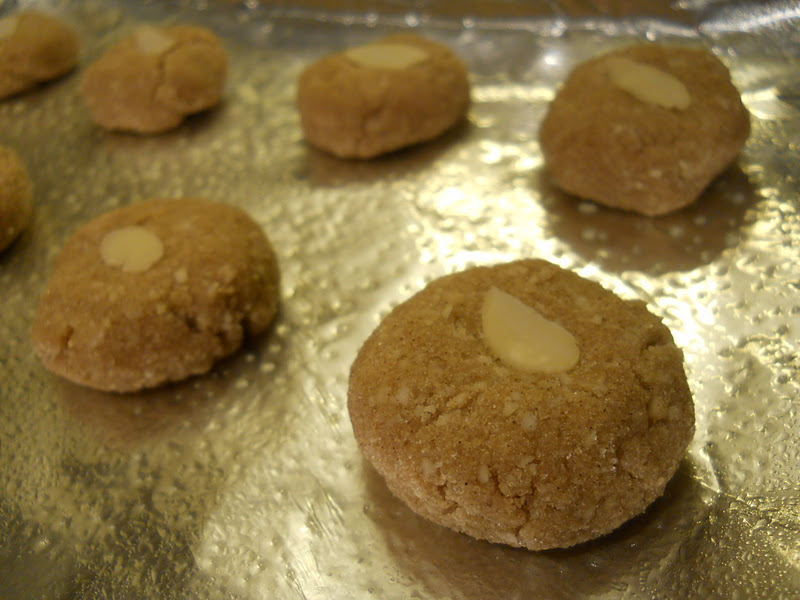
Drop teaspoon sized balls onto a greased, aluminum foil-lined baking tray. Be sure to leave approximately 1 inch of space between each cookie.
I liked to top each cookie with a slivered almond.

Bake the cookies in a 350°F oven for approximately 15 minutes. Be sure to let them cool prior to removing them from the baking sheet.

These cookies have a dense, chewy texture. They can be easily made ahead of time and frozen. Marroni are always a hit during the holidays!

Friday, December 16, 2011

Pecan Pie Cookies


Using the basic recipe for amaretti can be a great jumping off point for making other nut cookies. The basic premise is always there: whipped egg whites + sugar + ground nuts = great cookies. (To view my recipe for amaretti click here.)

The second recipe in this series is for pecan pie cookies.

I picked up a package of pecan meal the last time I was in Florida. The Sheffield Pecan Company carries some fantastic pecan products. I would highly recommend them.


You will need 2 cups of pecan meal and 1 cup of golden-brown sugar. I decided to use this type of sugar, because it adds a little bit more flavour than regular white sugar. Brown sugar contains molasses, giving it an enriched taste. (By the way, the darker the brown sugar, the more molasses it contains.)

Mix the dry ingredients together.


You will also require the whites of four eggs (8 tablespoons of egg whites).


Whip the whites to stiff peaks.


Add the egg whites to the dry ingredients.


Fold in the egg whites to form a dough.


Drop teaspoon sized balls onto a greased, aluminum foil-lined baking tray. Be sure to leave approximately 1 inch of space between each cookie.


These cookies don't really need any type of topping. However, I had some candied orange peels in the fridge, so I decided to use them.


Bake the cookies in a 350°F oven for approximately 15 minutes. Be sure to let them cool prior to removing them from the baking sheet.


These light cookies taste like little bites of pecan pie! Also, they are completely gluten and dairy-free.


Amaretti

Christmas is around the corner, so I've started my holiday baking. I like to start early with some nut-based cookies, because of their ability to hold well in the freezer.


This post will be a series of three recipes, all involving nuts of some sort. By the way, all of these cookies are gluten-free and dairy-free (in case you were wondering).


The first type are amaretti, a classic Italian cookie. Traditionally, the nut portion of the ingredients came from the almond-like inner pits of apricots. Nowadays, almonds are used. I have made this recipe with different type of almonds. You can use almond flour, blanched almond meal, ground whole almonds, or even the left over almond mulch from making almond milk (which is what I've used today). (For my recipe for homemade almond milk, click here.)


Whatever type of ground almond you decide to use, you will require 2 cups.


Note: If using almond mulch from almonds that were previously soaked in water, you will yield a thinner and flatter cookie.


To the almond mulch, add 1 cup of sugar.


Next, you will need the whites of four eggs (8 tablespoons egg whites) poured into a mixing bowl.


Whisk the whites until they make stiff peaks.

Now it's time to inject some flavour. I like to add 1 teaspoon of almond extract to the egg whites and give them a quick stir. Believe it or not, that's it for the wet ingredients!

Place your almond extract-infused egg whites on top of your dry mix.


Fold all of the ingredients together, until a dough is formed.


Drop, teaspoon-sized balls onto a greased, aluminum foil-lined baking sheet. Be sure to leave approximately 2 inches of space between each cookie, as the amaretti tend to expand quite a bit when they bake.


I like to add an espresso bean to the center of each cookie. Coffee and almonds are always a good pairing.


Bake the amaretti in a 350°F oven for approximately 15 minutes. Wait for them to cool completely before removing them from the baking sheet.

The end result will be a light and airy cookie with a pleasant roasted coffee surprise.

Friday, October 28, 2011

Cold Rice Salad

Rice is an extremely versatile grain. One of the more unusual ways of using rice is in a cold salad.


When making the salad, I like to use an Italian style rice. Italian rice is usually a short grain variety of rice, as seen below.


Now, I normally steam my rice. Italians, on the other hand, think rice is pasta and for this reason, they tend to boil their rice.


When preparing rice, using the boiling method, fill a pot with water and season it generously with salt. I also like to add a few drops of olive oil to the mix, as I would with preparing water for pasta.


Bring the liquid to a boil and add the rice. Gently stir intermittently throughout the cooking process.


Rice normally takes about 15 minutes to steam. However, I find that when boiling rice it takes a couple of minutes longer. Just check the rice at around the 15-minute mark to see how much more time it requires.


Italian style rice, as you can see below, is extremely starchy.

Simply drain the water from the rice using a colander. Once drained, run cold water over the rice to stop the cooking process. (This is a cold rice salad. So, you want your rice to be cold.)


Now that you have your cold rice prepared, it is now time to add the other ingredients.


Sliced green olives are a must.

Cooked vegetables also go well. I had some cooked green peas and butternut squash ready, so in it went! Other cooked vegetables also work great. Some ideas can include:
- roasted peppers
- sautéed onions
- cooked mushrooms
- roasted garlic
- steamed/boiled corn
- grilled zucchini


For the protein, I had some left over to tilapia. Under normal circumstances, I would use canned tuna. (Either the "in-oil" or "in-water" varieties work just fine.)

I also like to add fresh vegetables to the mix, for a crunch. I checked my refrigerator and I had some radishes and celery. Other fresh vegetables you could use could include:
- carrots
- bell peppers
- green onions
- fennel

Once you have all of your ingredients in the bowl, it will be time to add the seasonings.

I like to use oregano and dried chili flakes. (The chili flakes can be omitted.) Fresh parsley or cilantro could also be added very easily, instead of oregano. Given that this dish is a salad, I like to dress it with extra virgin olive oil and lemon juice.

Mix up all of the ingredients and you will have a fresh cold rice salad to use as an amazing side dish to any main course.

As this is a cold salad, you can prepare it well in advance. The flavours will actually intensify the longer it sits!

Tuesday, May 3, 2011

No-Stir Polenta

Polenta is great, peasant-style food that is made with simple ingredients. However, making it can be a chore, as it involves a lot of stirring, as well as a high risk for splatter burns. It is normally made by consistently stirring ingredients over a hot stove top.


What if I told you that there was a way to make the polenta without all the stirring? Well, read on, as this recipe is genius!


To begin, you will need 1 cup of medium-ground, yellow cornmeal.


In a pot, pour in 5 cups of cold water.


Here comes the secret ingredient...Baking soda! Baking soda, also known as sodium bicarbonate, is a very common ingredient found in most kitchens. It can be used for everything from baking cakes to cleaning. It also has a lesser-known property of breaking down foods.


For this recipe, you will only need a pinch. (It goes a long way!)


Add the cornmeal and the baking soda to the cold water. Salt can also be added at this time. (I used approximately half a teaspoon.)


Bring the liquid to a boil and then place a lid on top of the pot. You want to leave the lid slightly ajar to allow for some steam to escape. After coming to a boil, turn the heat down to a low setting (enough for the mixture to have a steady simmer). Leave the pot on the hot stove for 25 minutes. After the 25 minutes, remove the pot from the element and let the mixture stand for another 10 minutes.


Once you remove the lid, the polenta will look something like this.


Pour in approximately 1 to 2 tablespoons of extra virgin olive oil. Using olive oil at this point will provide better flavour and nutrition to the dish.


Give the mixture a quick whirl. Be sure to pick up any stiffer bits from the bottom and mix them in well.


Transfer the polenta to a serving dish and it will be ready to eat!


In this form, the polenta will be creamy. If you leave it out or in the fridge it will solidify and get a different texture for use.


Polenta is perfect for breakfast, lunch or dinner. My absolute favourite way to have it is with a dash of ground cinnamon and a drizzle of honey for a healthy and yummy morning meal.