Wednesday, January 26, 2011

Corn-fed Americans

Cornbread is an American classic, usually found in the southern United States. It is classified as a quick bread, which basically means it uses leavening agents other than yeast.


For some reason, I have always found it rather difficult to make. Until now. I figured out this recipe through researching other recipes and doing some experimentation in the kitchen. I was actually able to make it completely gluten and dairy-free. To my surprise, I like it better than other versions I have tried!


To make it, combine the following dry ingredients in a mixing bowl:
- 1 cup yellow cornmeal
- 1/2 cup chickpea flour
- 1/2 cup white rice flour
- 1/4 cup sugar
- 2 teaspoons baking powder
- 1 teaspoon baking soda
- 1/2 teaspoon salt


(You may want to use a whisk to combine the ingredients thoroughly.)


In a separate bowl, combine the following wet ingredients:
- 1 egg
- 1/4 cup olive oil
- 1 cup rice milk


I decided to use rice milk in this recipe, because of its sweetness. (To view how to make your own rice milk, click here.)


Next, combine the dry and wet ingredients together. Mix thoroughly using a whisk to prevent any lumps from being formed.


Transfer the batter into a greased 8" baking pan. Place it in a pre-heated 375°F oven for approximately 25 minutes. 


As the cooking time will depend on your individual oven, check the loaf using a toothpick to make sure it is done. Basically, insert a toothpick into the loaf and remove it. If the toothpick comes out clean, your bread is done.


Your cornbread should have and even golden colour, as seen below.


This particular cornbread is light and fluffy. It is extremely easy to cut and has complex savory and sweet qualities. Not to mention, it smells divine!


Tuesday, January 25, 2011

A papaya puesta, papaya partida

Papaya is a tropical fruit that is full of natural enzymes that break down food. These enzymes have been used in supplements to aid digestion. I like to use this particular property of the fruit for another purpose; marinades.


You can create a simple marinade, as I did, using the following ingredients:
- half a small ripened papaya (chopped and mashed)
- the juice of half a lemon
- olive oil
- chili powder
- red chili flakes
- freshly ground black pepper
- salt (to taste)
- thyme


Speaking of time, you will also need some of that. Place some skinned chicken pieces in a bowl and cover it with the marinade. (I used four quartered boneless chicken thighs.) Cover it with plastic wrap and leave it to sit in the fridge for 12-24 hours.


Transfer the contents to a roaster, cover and place it in an oven set to 350°F. Cook the chicken until it reaches an internal temperature of 182°F.


Note: Never take chances with chicken. Always use a meat thermometer!


The result will be an incredibly tender and juicy chicken.


Feel free to cook this chicken in any other way, including:
- barbecuing
- grilling
- broiling
- pan frying


Enjoy the papaya chicken with your favourite starch. A great combination is having it with cornbread. My recipe will be coming soon.

Monday, January 24, 2011

Milk it for all it's worth

Rice is an amazing multi-purpose grain. It can be steamed, pulverized into a flour, and even milked (technically speaking).


Dairy continues to be a difficult food product to digest, for a number of people. Rice milk is a great solution for some. However, mass manufactured rice milk tends to be full of unnecessary oils, sugars, emulsifiers and preservatives.


Homemade rice milk is actually quite simple to make.


Begin with approximately one cup of freshly cooked, warm rice and put it in a blender. I like to use either basmati or jasmine rice for this purpose, as these varieties tend to be quite fragrant and flavourful.


Next, add a few drops of vanilla extract and 2-4 madjool dates for sweetness. (To read about madjool dates click here.) You do not necessarily need to use the dates at all. If you would like to sweeten your rice milk, feel free to use sugar, agave nectar or honey instead.


Add approximately 4 cups of warm water to the blender.


Blend the mixture until smooth. Leave the liquid, in the blender, to sit for approximately 20 minutes to let the solid particles settle.


After waiting, slowly pour out the liquid and ensure that the solids remain in the blender. Your rice milk is ready.


Do not throw away the sediment.


You can combine it with a dash of cinnamon and some raisins to create a wonderful tasting dairy-free rice pudding.


Sunday, January 23, 2011

Amaranth

The Aztecs, Maya and Inca all had great ancient civilizations in the Americas. These cultures were able to survive due to their ability to cultivate the land. One of the crops they produced was amaranth.
(Copán Ruinas, Honduras)


Amaranth is a grain-like the seed that resembles a small version of quinoa. It is available at most bulk food stores in the Greater Toronto Area. I found that amaranth was very easy to cook and had an amazing flavour to boot.


To cook it, you will need 1/2 cup of amaranth.


Begin to boil 1 1/2 cups of water with half a teaspoon of salt.


Place the amaranth into the boiling water and let it simmer for one minute. Cover the pot, turn the flame to low, and allow the grains to steam for approximately 20-25 minutes.


The result will be a glossy mixture which resembles as a mix between quinoa and polenta.


I was honestly surprised by its taste! I had some sauce all ready to dress the grains, but I did not need it at all. Amaranth has a nutty flavour that will work well as a substitute for the starch in your next meal.

Saturday, January 22, 2011

Well Grounded

I have found that buying edible sprouts is quite common nowadays. Also, it has become quite trendy to grow your own sprouts. Cool little gadgets, meshes and growers seem to be available to the mass market. In fact, I have personally seen moong (a.k.a. mung) bean growers for sale for an exuberant amount of money. I want to let you in on a secret...


Moong beans are very inexpensive and you do not need any fancy equipment in order to sprout them!


Moong beans can be purchased at any Indian or Chinese grocery store. The average price for these beans is approximately $1.00-$1.50/lb CAD. (That's a whole lot of beans!)


On to the sophisticated and highly technical equipment. I use a glass pie plate. You may also use a shallow bowl. Simply put a handful of moong beans in the plate and cover with cold water. Be sure not to overfill your plate with the beans. They will increase in size considerably.


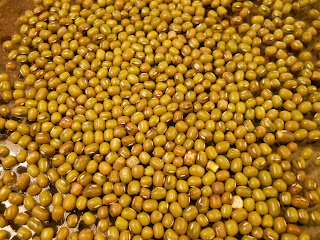
I usually place the plate where it won't be knocked around and where it can be kept relatively warm. Above the fridge works best for me. You will notice that the beans will start to grow quite quickly. This picture was taken after the beans were soaked overnight.


As the beans grow and the water evaporates, you will need to top your plate with more water.


As a general rule of thumb, your beans are ready once the roots are approximately the size of the bean (or longer). Give them a rinse, using a colander or sieve, under some fresh water and they will be ready to use. Feel free to keep the husks, as they are a great source of fiber.


There are many ways to enjoy sprouted moong beans. One of my favourite ways is by creating a salad with moong bean sprouts, steamed corn, olive oil, lemon juice and sea salt.


Other ways of using these sprouts include:
- creating a sprouted moog bean curry
- adding them to a stir-fry
- steaming them by themselves or with other vegetables
- sprucing up a boring salad by adding a handful

Monday, January 17, 2011

Comments from the Peanut Gallery

As I do not enjoy challenging baking, I was thrilled when I found this recipe for peanut butter cookies (a personal favourite). It only contains three ingredients!


I was also equally excited, as this recipe does not require any flour whatsoever, making it completely gluten-free!. I must thank S.J. and M.D-M. for providing me with their versions of the recipe.


Begin with approximately 1 cup of peanut butter. Whenever any recipe calls for peanut butter, I always use the 100% roasted peanut type. This type of peanut butter contains no added sugars, fats or preservatives. I have been able to find many brands of this type of peanut butter in a wide range of grocery stores.


Then comes the other two ingredients: one egg and 1/3 cup of sugar. I have tasted similar cookies made with varying amounts of sugar. I have seen recipes where the ratio of sugar to peanut butter is 1:2 and as high as 1:1. What I have found is that it all depends on your taste and it will not change the outcome of the cookie whatsoever (except to make them sweeter if more sugar is added). I prefer my cookies slightly sweet, hence the relatively small amount of sugar.


Stirring the mixture together will quickly form a dough.


Take small amounts of dough and form them into balls. Press the balls into cookie shapes and place them on an ungreased baking sheet. You may also press down with a fork to create the characteristic sign for peanut butter cookies.


Bake at a 325° F oven for approximately 10 to 15 minutes (depending on your oven). Do not let them over bake. Let the cookies cool slightly before removing them from the sheet.

I did not believe that these three ingredients together would form such a great cookie!

Feel free to add other ingredients, such as:
- vanilla extract
- chocolate chips
- raisins or dried fruit 
- other nuts (e.g. cashews, almonds, walnuts, etc.)


Addendum (January 22, 2011):
I tried making the above recipe with almond butter, instead of peanut butter. Here's the result:

They are absolutely wonderful!

Thursday, January 13, 2011

Panisse de Toronto

For those of you who remember my post about Panisse, a specialty dish from Nice, France, you will note that I have been searching for a place to buy it. (Please click here to view the entry as well as uses for panisse.) Well, I got really tired of looking for it. So, I decided to make it myself. Quite surprisingly, it was extremely easy.

Begin with 2 cups of chickpea flour.


In a sauce pot, add the flour, a generous teaspoon of sea salt and 2 teaspoons of olive oil. Turn the stove to the high setting and add 2 cups of hot water. Begin to whisk the mixture until it is smooth.

Within seconds, the mixture will start to get thick and you will need to switch to using a wooden spoon. Keep stirring the mixture until it thickens to the point where it starts to separate from the sides of the pot. It should look like mashed potatoes when it's ready.


Place the mixture in a ramekin, bowl or pan, greased with olive oil. With a little bit of olive oil on your fingertips, push the fluffy mixture down to get a smooth finish.

Let the mixture cool, cover with plastic wrap and refrigerate until you need to use it.  After this process, I realized that panisse is basically the chickpea version of polenta. It can be sliced and then fried or baked.


Now you don't need to go all the way to France to enjoy it!

Wednesday, January 12, 2011

Whore sauce?

Puttanesca is an Italian sauce, whose name indicates that it was made "in the style of the whore". The sauce basically got it's name because, it was believed that cheating women didn't have time to cook properly and therefore, needed to make a quick meal for their husbands.


Well, at least the "quick" part is true. To make it, literally takes five minutes. It is extremely flavourful and trying it will leave you wanting more.

You will require the following ingredients:
- approximately 1 1/2 to 2 cups of puréed or chopped tomatoes
- 2 tablespoons of olive oil
- peperoncino or red chili flakes (to taste)
- 2 large cloves of garlic (finely minced)
- 1/2 teaspoon of anchovy paste (or chopped anchovies)
- a generous tablespoon of dried oregano
- a handful of chopped and pitted black olives (I used Kalamata this particular time)

Capers can also be used in this recipe. (By the way, they are not fish.) I basically use them if I have them.

Begin with placing the olive oil, peperoncino and garlic in a pan on high heat. Let the garlic turn a light golden brown.

At that point, add your anchovy paste.

You may proceed to add the olives and capers and coat them with the hot oil. The last few steps should have taken you approximately 2-3 minutes, as you don't want your ingredients to burn (especially the garlic).

Finally, add the puréed tomatoes and oregano and give it a quick stir. The heat of the pan and the hot ingredients will, within seconds, turn the mixture into a sauce.

Presto! You're done!

The puttanesca will be a spicy and hot mixture of wonderful Mediterranean ingredients. It is great with:
- your favourite pasta
- seafood (e.g. shrimp, scallops, scampi, calamari, octopus, etc.)
- used as a dip with bread
- over vegetables


Thanks to A.V. for providing me with her mother's recipe. Mille grazie!


Note to readers: I have recently changed the settings on this site, so that reader comments can be added without any sign-up. I hope that makes it easier for those who would like to comment on posts. Keep reading!

Tuesday, January 11, 2011

Kitchari

It seems that every culture has their hodge-podge food creations. There is no exception with India. Kitchari is one of those throw-it-in-a-pot-and-cook-it-'till-it's-done creations. My understanding is that it was originally a dish created with leftovers, before the days of refrigeration. Nowadays, it seems to be a specialty dish, as many of these types of food tend to turn into over time. By the way, you will never find this dish in an Indian restaurant. It is, very much, a home food.


You will need to begin with approximately 1 to 1 1/2 cups of long-grain white rice. Proceed to rinse the rice, under cold water, a few times to remove any excess starch.

You will also require some mung beans (a.k.a. moong beans). This tiny bean is native to India and is available in most supermarkets. It is also available in whole and split varieties. Either will do for this recipe. There are many uses for this bean including the creation of bean sprouts and bean starch.


Place the rice in a pot, along with a handful of mung beans and approximately 1 to 1 1/2 teaspoons of salt (depending on your taste). Also add 3 to 4 times the amount of water to that of rice. (Note: You can also add more water, if needed, during the cooking process.)

As this is a mish-mash recipe, just let it simmer until it reaches the consistency of porridge.

This hearty dish is filling and perfect for winter time. It has a good mixture of carbohydrates and protein and is also great for babies and young kids.


I used to love this dish as a child. It also gives me fond memories of my grandmother.


You can enjoy this dish in the following ways:
- by itself
- along with your favourite curry (instead of serving it with plain rice or roti)
- with yogurt
- served with warm milk poured on top
- along with achar (a spicy Indian pickled side dish made with fruit and/or vegetables, e.g. carrot pickle or green mango pickle)
- with marinated olives (not a traditional use, but my favourite)

Saturday, January 8, 2011

Shrikhand

Shrikhand is a popular sweet dish from Gujarat, India. Its preparation is quite simple, but it takes time to process the ingredients.


You will need to begin with an amount of strained plain yoghurt. (To view how to make your own strained yoghurt, click here.)


For this recipe, I used the amount of strained yoghurt yielded from 2 L of homemade yoghurt. (To view the method for making homemade yoghurt, click here.) This amount of yoghurt will create enough shrikhand for approximately 6-8 servings.


Begin to whisk the yoghurt with some icing sugar. The amount of icing sugar needed will depend on the tartness of the yoghurt and your personal taste. It should taste lightly sweet with a little bit of tartness.


As this is an East Indian dish, spices are required. In a mortar and pestle, grind 10 cardamom pods into a fine powder. Be sure to remove the tough outer husks. If using previously-ground cardamom powder, you will require approximately 1/2 a teaspoon.


You will also require a couple of pinches of saffron. Grind the saffron between your thumb and forefinger. Remember that a little goes a long way!


Add the spices to the whipped yoghurt and give it a whirl.


You will need to chill this mixture before serving it. Waiting a little while will allow the spices to infuse their flavours into the dessert. You will notice that as it sits, the saffron will begin to bleed a beautiful orange colour into the yoghurt.


Once ready, give the mixture another quick turn. Serve it in individual glasses and top it with some crushed pistachio nuts and slivered almonds.


This dessert is creamy, simple and delightful.